Making a new skin colour, the easy way.
To create a new skin you have to edit so many files! This makes it quick and easy. Enjoy! :)
Disclaimer: This tutorial assumes you already know how to do basic skin editing.
It was put together from forum posts, and so is a bit harder to follow than most of my tutes.
1) Download and install IrfanView from here: http://www.irfanview.com
2) Export a skin texture (the pale one works best)
3) Open one of the exported images in IrfanView
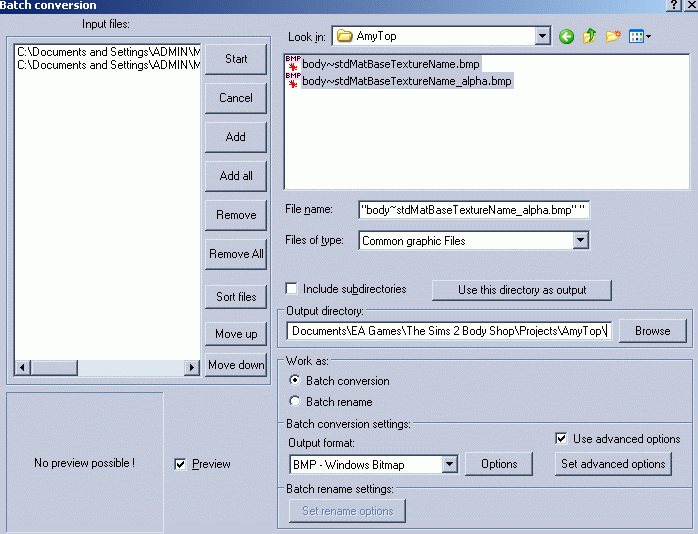
4) Press "B" to open the batch dialog
5) Use "Add All" to add all the skin pics into the left hand window pane.
6) Select the "batch conversion" radio button
7) Press "use this directory as output"
8) Make sure output format is BMP
This is what it should look like so far, except that you will be editing about 50 files instead of two:

9) Tick "Use advanced options"
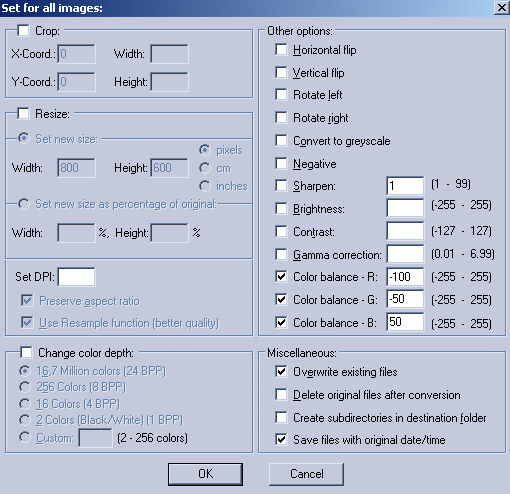
10) Go into advanced options, here is where you change the colour:
The R, B, and G represent the levels of Red, Green, and Blue you can add or subtract from the pic. You can also change the contrast, brightness etc.
Try this settings to change the colour of the skins to blue!
R: -100
G: -50
B: 50
This is what it should look like:

11) Select ok when you have decided on the settings you want.
12) Press start to begin!
thats it!
If you did everything right, every skin should now be converted to blue!
To find out the settings for other colours, open a pic and press SHIFT-G.
Then you can play around with the sliders to find the colour you want :)
Note that this will edit the skin files diectly so you can not undo changes if you made a mistake!
If you DID make a mistake, delete this project, clone a new skin, and start again.
If you have any questions or comments, you can ask me personally by clicking here.
<- Back to Sims 2 Content Listing
